How to Clean Brita Water Bottle? Easy & Quick Steps!
To clean your Brita water bottle, first disassemble it by unscrewing the lid and removing the filter. Gently pull out the mouthpiece and silicone gasket if present.
Rinse each component with warm water and a gentle, phosphate-free dish soap. For the filter, rinse under cold water for 15 seconds without using soap.
Scrub the filter’s exterior with a soft brush and let it sit in clean water for 15 minutes before rinsing again.
Dry all parts thoroughly on a towel in a well-ventilated area to prevent bacterial growth. For more detailed steps and tips, continue exploring this guide.
Key Takeaways
Disassemble the Bottle
Begin by unscrewing the lid and removing the filter from your Brita water bottle. Hold the base of the bottle steady with one hand while twisting the lid counterclockwise with the other. Once the lid is off, gently pull the filter out of its housing.
Next, detach the mouthpiece or straw, if your model includes one. These components often snap or twist off easily.
Make sure you also remove the silicone gasket, a small ring that creates a seal between the lid and bottle. You might need to use a fingernail or a small tool to carefully pry it loose.
With all parts disassembled, you’re ready for the next step in the cleaning process, ensuring each component is treated individually.
Rinse With Warm Water
First, remove the filter to prevent any damage during cleaning. Rinse each component with warm water, ensuring all residue is washed away.
Use a gentle soap to clean the bottle parts thoroughly, then rinse again to remove any soap traces.
Remove Filter First
Before diving into the cleaning process, remove the Brita filter by twisting it counterclockwise and rinse it thoroughly under warm water. This step is essential for maintaining the filter’s best efficiency.
Hold the filter under a gentle stream of warm water, ensuring all exterior surfaces are rinsed. Avoid using hot water, as it may damage the filter media.
Carefully inspect the filter for any visible debris or buildup and gently shake it to dislodge any trapped particles.
Use Gentle Soap
To guarantee thorough cleaning, use a gentle, non-abrasive soap to wash the interior and exterior of your Brita water bottle, rinsing it meticulously with warm water. This guarantees that no residue or harmful chemicals remain.
Here’s a step-by-step guide to help you:
- Apply Soap: Use a small amount of mild soap on a soft sponge or bottle brush.
- Scrub Thoroughly: Clean all parts, including the cap and mouthpiece, ensuring every nook and cranny is addressed.
- Rinse Well: Rinse each component under warm running water to remove all soap traces.
- Inspect: Check for any leftover residue or soap bubbles to make sure complete cleanliness.
Following these steps will maintain your bottle’s hygiene and longevity.
Use Dish Soap
Choose a gentle dish soap to avoid damaging the bottle’s materials. Apply a small amount to a sponge or bottle brush, ensuring you reach all internal surfaces. Rinse thoroughly with warm water to remove all soap residues. Allow the bottle to air dry completely by placing it upside down on a drying rack to prevent moisture buildup. For deeper cleaning, you can use a mixture of vinegar and baking soda to remove any lingering odors or stains. If you’re looking for more tips on how to clean Nike bottle, refer to the manufacturer’s care instructions to ensure longevity.
Choose Gentle Dish Soap
Opt for a gentle dish soap that effectively cleans without leaving harmful residues. When selecting a dish soap for your Brita water bottle, it’s important to choose one that’s mild yet efficient.
Harsh chemicals can degrade the bottle’s materials and may leave behind unwanted residues.
Follow these guidelines:
- Ingredients: Look for soaps free from phosphates and strong detergents.
- Fragrance-Free: Select unscented options to avoid lingering tastes.
- Eco-Friendly: Choose biodegradable soaps to help protect the environment.
- pH Balanced: Ensure the soap is pH neutral to prevent material wear.
Using a gentle dish soap will safeguard your Brita water bottle’s condition, providing clean and safe hydration. This careful selection reflects your dedication to maintaining both your health and the bottle’s performance.
Proper Rinsing Technique
Start by thoroughly rinsing your Brita water bottle with warm water to remove any loose debris before applying the dish soap.
Make sure the water runs through the mouthpiece and reaches all inner surfaces. After the initial rinse, add a few drops of gentle dish soap inside the bottle.
Use a bottle brush to scrub the interior, focusing on hard-to-reach areas like the bottom and the neck.
Don’t forget to clean the cap and the mouthpiece separately, ensuring you remove any residual buildup.
Rinse the bottle and its components thoroughly under warm water to eliminate soap residues. Inspect for any remaining soap by shaking the bottle with a bit of water and checking for suds.
Repeat if necessary.
Scrub the Bottle
Using a bottle brush, scrub the interior of the Brita water bottle to remove any residue or buildup. Make sure to choose a brush that’s long enough to reach the bottom and flexible enough to navigate the bottle’s contours.
Follow these steps:
- Add Cleaning Solution: Fill the bottle with warm water and a few drops of mild dish soap.
- Insert the Brush: Place the brush inside the bottle, ensuring it reaches all areas.
- Scrub Thoroughly: Use firm, circular motions to dislodge any stuck particles or stains.
- Rinse Completely: After scrubbing, rinse the bottle thoroughly with warm water to remove any soap residue.
This process guarantees that your Brita bottle is hygienic and ready for use.
Clean the Filter
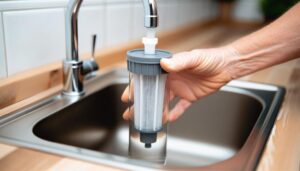
To clean the filter, first remove it from the Brita water bottle by gently twisting it counterclockwise.
Rinse the filter under cold running water for 15 seconds. Don’t use soap or other cleaning agents; they can damage the filter’s carbon structure.
Use a soft brush to gently scrub the filter’s exterior, removing any visible debris. Make sure you handle the filter with care to avoid damaging the internal components.
After rinsing and scrubbing, let the filter sit in a bowl of clean water for about 15 minutes. This helps to loosen any trapped particles. Avoid using hot water, as it can compromise the filter’s effectiveness. After soaking, give it a final rinse under cold water.
Dry Thoroughly
Make sure every component of the Brita water bottle, including the filter, is completely dry before reassembling to prevent mold and bacterial growth.
Follow these steps to guarantee thorough drying:
- Disassemble Completely: Separate all parts – the bottle, cap, filter, and mouthpiece.
- Air Dry: Place components on a clean, dry towel in a well-ventilated area. Ensure they’re spaced out to allow airflow.
- Pat Dry: Use a lint-free cloth to pat down any excess moisture, especially in crevices and around threads.
- Inspect Thoroughly: Before reassembling, check each part for any remaining moisture. Confirm every surface is dry to the touch.
Conclusion
To summarize, cleaning your Brita water bottle is a piece of cake. Disassemble all parts, rinse them with warm water, and use a few drops of dish soap. Scrub the bottle thoroughly, paying close attention to any nooks and crannies.
Don’t forget to clean the filter separately. Finally, let all components dry completely before reassembling.
By following these steps, you’ll guarantee your bottle remains in excellent condition, providing fresh, clean water every time.

