Diy Paracord Water Bottle Holder: Step by Step Guide!
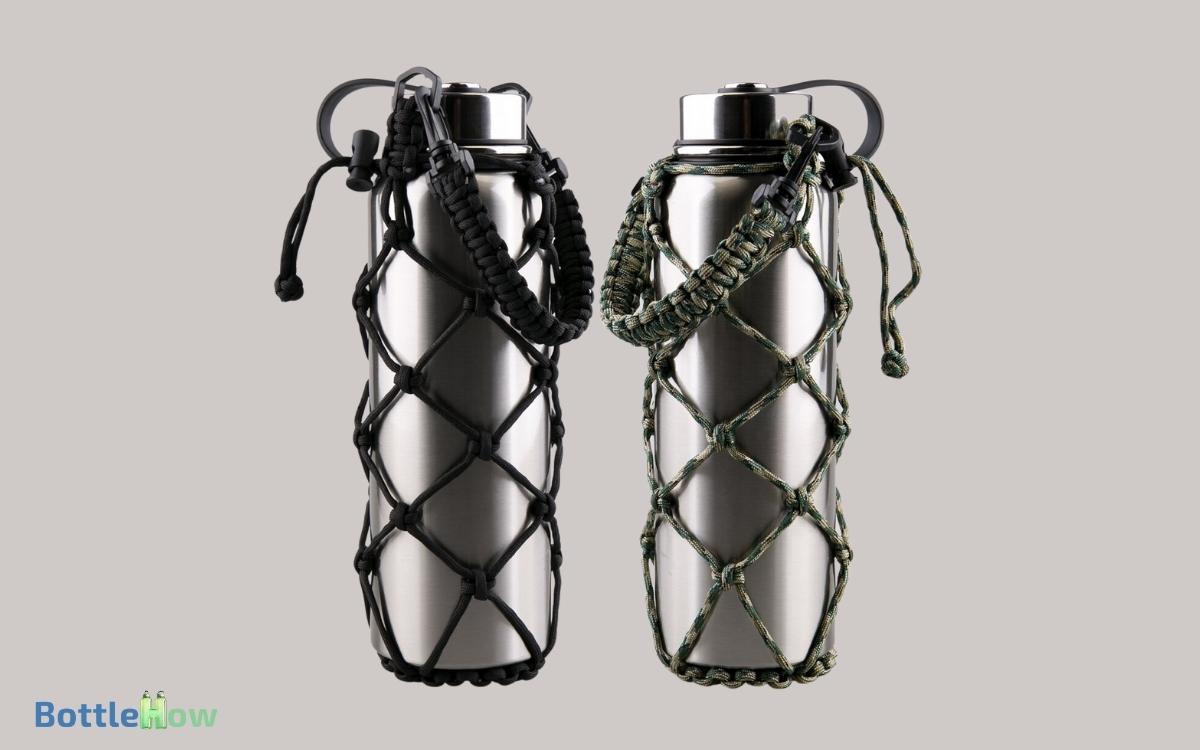
Making your own paracord water bottle holder is easy and functional. Start by cutting and melting 10 feet of paracord to prevent fraying.
Pass the paracord through the bottle cap loop, securing it with a double fisherman’s knot. Attach a carabiner to the paracord loop and begin your cobra weave pattern.
For the base, create a circular loop matching your bottle’s diameter, secure with lark’s head knots, and stitch ends together.
Trim any excess cord and melt ends for durability. Tightening all knots guarantees a sturdy, neat holder. Ready to tackle more steps and refine your creation’s design?

Key Takeaways
Materials Needed
To make your own paracord water bottle holder, you’ll need a few essential materials to guarantee durability and functionality.
- First, get at least 20 feet of 550 paracord, known for its strength and versatility.
- Next, secure a sturdy carabiner clip to attach the holder to your bag or belt loop.
- You’ll also need a lighter to melt the ends of the paracord, preventing fraying.
- A ruler or measuring tape ensures accurate length measurements.
- Finally, acquire a pair of sharp scissors or a paracord cutter for clean cuts.
With these materials, you’re well-equipped to create a reliable and functional holder that will stand up to everyday use.
Measuring and Cutting Paracord
Begin by measuring out 10 feet of paracord, ensuring accuracy with a ruler or measuring tape. Accuracy is vital, as incorrect lengths can affect the final holder’s functionality.
Lay the paracord flat on a clean surface, preventing any twists or tangles. Mark the 10-foot point clearly with a piece of tape or chalk.
Now, using sharp scissors or a dedicated paracord cutter, cut the cord at the marked point. Make sure a clean cut to avoid fraying.
Next, use a lighter to carefully melt the cut ends, sealing them to prevent unraveling. Hold the flame close but don’t let it scorch the paracord.
Your cord is now ready for the next steps in crafting your water bottle holder.
Preparing the Bottle
Start by thoroughly cleaning your bottle to make certain there’s no dirt or residue. Next, measure the length of paracord you’ll need based on your bottle’s dimensions.
Clean the Bottle
Before crafting your paracord water bottle holder, make sure the bottle is thoroughly cleaned to remove any dirt or residue.
Start by rinsing the bottle with warm water. Use a bottle brush to scrub the interior, focusing on the bottom and sides.
Apply a small amount of mild dish soap, making sure you reach all crevices. Rinse thoroughly to remove soap residue.
For the exterior, wipe it down with a damp cloth. If the bottle has a cap or lid, disassemble it and clean each part individually.
Dry the bottle completely with a clean towel or allow it to air dry. This ensures no moisture remains, preventing mold growth inside your paracord holder. Cleanliness is important for a hygienic and long-lasting holder.
Measure the Paracord
With your bottle clean and dry, measure out approximately 10-12 feet of paracord to make sure you have enough material to create a secure and functional holder. Use a measuring tape or a ruler to get an accurate length.
It’s better to have a little extra than not enough, as you can trim any excess later. Lay the paracord flat on a surface, avoiding tangles. Hold one end firmly and pull the cord along the measuring tool until you reach the desired length.
Once measured, cut the paracord cleanly with sharp scissors to prevent fraying. To seal the ends, carefully melt them with a lighter, ensuring they don’t unravel during the crafting process.
Secure the Cap
Making sure the bottle cap is securely in place, thread one end of the paracord through the loop or handle of the cap to create a firm anchor point. This step is essential for maintaining stability and preventing any accidental spills.
Once threaded, tie a tight knot, such as a double fisherman’s knot, to guarantee it won’t come loose.
Pull the paracord taut to check the security of the knot. Make sure there’s no excess slack in the cord, as this can compromise its effectiveness.
Test the cap connection by gently tugging on the cord; it should remain firmly attached. This ensures your water bottle stays intact and ready for the next steps in crafting your paracord holder.
Starting the Weave
Begin the weave by folding your paracord in half, creating a loop at the midpoint which will serve as the starting point for your water bottle holder.
Thread the loop through the carabiner, then pull the ends of the paracord through the loop to secure it. Now, align your paracord strands and make sure they’re even.
Next, you’ll want to establish a pattern. Use a simple cobra weave (also known as a Solomon bar) for a sturdy and reliable holder.
Creating the Base
Now that your cobra weave is securely started, it’s time to craft the base that will support the bottom of your water bottle.
First, measure the diameter of your bottle’s base. Cut a piece of paracord to this length plus an extra inch for securing.
Lay this piece flat and use it to form a circular loop, overlapping the ends. Stitch the ends together with a strong knot, ensuring it’s tight.
Next, create a series of smaller loops around the circumference, attaching each to the main loop with lark’s head knots. These loops should be evenly spaced and snug.
Building the Sides
Now that the base is complete, you’ll need to measure the appropriate length of paracord for the sides. Cut enough cord to make certain it can wrap securely around your water bottle.
Next, use the cobra weave technique to create a sturdy and flexible structure for the sides.
Measuring Paracord Length
To determine the correct paracord length for building the sides, measure the height and circumference of your water bottle.
Then multiply the circumference by the number of vertical cords you plan to use. This guarantees you have enough paracord to create a snug, secure fit.
For accurate results, follow these steps:
- Measure Height and Circumference: Use a flexible tape measure for precision.
- Multiply Circumference: Decide on the number of vertical cords (usually 4-6) and multiply by the circumference.
- Add Extra Length: Include an additional 10-20% to account for knots and adjustments.
Weaving Techniques Explained
Begin by securing the ends of your paracord to a stable anchor point, making sure you maintain consistent tension throughout the weaving process.
Start with a basic cobra weave. Create a loop with the left cord over the center strands, then pass the right cord over the left, behind the center, and through the loop.
Pull tight. Repeat the process, alternating sides, until you’ve covered the required length for your bottle holder sides. Keep your weaves snug and even.
Check periodically for tension consistency; it prevents sagging. Once complete, secure the ends with a knot or by melting them with a lighter for durability.
This technique guarantees a strong, reliable holder for your outdoor adventures.
Adding the Handle
After securing the main body of the holder, you’ll weave the paracord to create a sturdy and comfortable handle. Start by cutting a length of paracord, around 3-4 feet, depending on the desired handle length.
Fold the paracord in half to find the midpoint. Attach the midpoint to the top of the holder using a lark’s head knot.
Now, you’ll braid the paracord:
- Separate into three strands.
- Weave an over-under pattern.
- Tighten each weave for durability.
Ensure the braid is consistent and tight. When you reach the end, tie a secure knot and melt the ends with a lighter to prevent fraying. This handle will provide both strength and comfort for carrying your water bottle.
Finishing Touches
With the handle securely in place, focus on trimming any excess paracord and making sure all knots are tight for a polished and durable finish.
Use sharp scissors to cut the ends close to the knots, then carefully melt the tips with a lighter to prevent fraying. Check each knot to confirm it’s snug and won’t come loose.
| Task | Purpose |
|---|---|
| Trim excess paracord | Guarantees a neat appearance |
| Melt paracord ends | Prevents fraying |
| Tighten all knots | Ensures durability |
These final steps aren’t just about aesthetics; they guarantee your water bottle holder is functional and long-lasting. By carefully reinforcing the stitching and ensuring all attachments are secure, you can prevent wear and tear over time. If you’re looking for more handy DIY projects, check out a DIY faucet extender tutorial to make sink access easier for kids. Adding these small but effective improvements to your home can make daily tasks more convenient and efficient.
Take your time to inspect your work, making sure every detail is perfect. You’re now ready to enjoy your new, sturdy, and stylish accessory.
Conclusion
You’ve now crafted a convenient and cool paracord water bottle holder. This project, packed with practical potential, showcases your skill and savvy in DIY creations.
With your bottle securely bound and stylishly suspended, you’re ready for every adventure. The blend of function and flair in this handmade holder highlights the harmony of form and function.
Keep crafting confidently, and remember: a bit of creativity and some sturdy string can create something spectacular. Happy hydrating!


