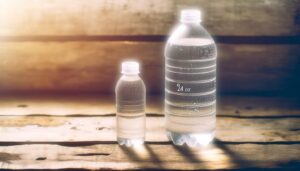
How to Put Name on Water Bottle
To put your name on a water bottle, start by choosing a method like waterproof labels, vinyl stickers, paint pens, or permanent markers. Clean the bottle with soap and water, then dry it thoroughly.
For labels or stickers, peel the backing and carefully apply them, smoothing out any bubbles. Using paint pens or markers, write directly on the clean surface and let it dry completely.
If you prefer a more permanent option like engraving, prepare a digital design and use a laser engraving machine. Each method has its unique steps and benefits, and you can explore more detailed instructions and tips.

Key Takeaways
- Use waterproof labels for a durable and easily applied name tag on your water bottle.
- Vinyl stickers offer customizable and colorful designs that adhere well when applied correctly.
- Permanent markers provide a quick and straightforward method for labeling, especially on smooth surfaces.
- Paint pens allow for personalized and artistic names, with oil-based or acrylic pens being ideal for water resistance.
Using Waterproof Labels

Why not consider using waterproof labels to guarantee your name stays on the water bottle despite frequent washes and daily wear?
First, purchase high-quality, waterproof labels designed specifically for durability.
Next, clean the surface of the water bottle thoroughly. Use soap and water to remove any dirt or oils, then dry it completely.
Carefully peel the backing off the label, taking care not to touch the adhesive side.
Place the label on the bottle, pressing down firmly to ascertain it adheres well. Smooth out any air bubbles with your fingers.
Permanent Marker Tips
If you'd rather skip the labels, using a permanent marker is another effective way to guarantee your name stays on your water bottle.
First, choose a high-quality, waterproof permanent marker. Clean the surface of the bottle thoroughly with rubbing alcohol to confirm the ink adheres better.
Dry the bottle completely. Write your name in clear, legible letters. For added protection, let the ink dry for a few hours before handling the bottle. You can even trace over your name a second time for extra durability.
Avoid writing on textured or uneven surfaces as the ink may not adhere well. This method guarantees your name remains visible, even after multiple washes.
Vinyl Stickers
To personalize your water bottle with vinyl stickers, start by designing and customizing the stickers to match your style.
Once you have your design, carefully apply and secure the stickers to guarantee they adhere properly.
Make sure to smooth out any air bubbles for a clean, professional look.
Design and Customize Stickers
When designing and customizing vinyl stickers for your water bottle, start by selecting a durable, waterproof material that guarantees longevity and withstands daily wear and tear.
Focus on creating a design that reflects your personality while confirming it's functional and easily readable. Here's a step-by-step process:
- Choose a font and color: Pick a font that's clear and vibrant colors that stand out against your bottle's background.
- Create a design template: Use design software like Adobe Illustrator or Canva to draft your sticker. Include any graphics or additional text you want.
- Print and cut: Once your design is finalized, print it on vinyl sticker paper and carefully cut out the shapes using a precision cutter.
This method confirms a personalized, professional look.
Apply and Secure Stickers
Begin by thoroughly cleaning the surface of your water bottle to guarantee the vinyl stickers adhere properly and last longer. Use a mild soap and water solution, then dry it completely with a lint-free cloth.
Next, position your vinyl sticker where you want it. Peel off the backing paper carefully, ensuring the sticker doesn't touch anything until it's in place. Press the sticker onto the bottle, starting from the center and smoothing outwards to eliminate air bubbles.
To secure the sticker, use a squeegee or credit card to press it firmly. Allow it to set for at least 24 hours before use.
| Step | Action |
|---|---|
| 1 | Clean the bottle surface |
| 2 | Dry with a lint-free cloth |
| 3 | Position and peel the sticker |
| 4 | Press and secure with a squeegee or card |
Engraving Options
Engraving your name on a water bottle offers a durable and stylish way to personalize your hydration gear. Here’s how you can do it effectively: You can choose from various engraving methods, such as laser engraving or hand etching, depending on your preference and budget. Selecting a high-quality, durable bottle ensures that the engraving remains intact over time. If you’re curious about different accents, you might even look up how to pronounce water bottle in various English dialects while customizing your unique accessory.
- Choose the Right Material: Make sure your water bottle is made of engravable materials like stainless steel or glass.
- Select an Engraving Method: Options include laser engraving for precision or hand engraving for a personal touch.
- Prepare Your Design: Use design software to create a template or sketch your design on paper.
Once you've completed these steps, clean the surface of the bottle to remove any oils or residues.
Then, follow the instructions for your chosen engraving method, making sure you work in a well-ventilated area for safety.
This method will give your bottle a professional and permanent mark.
Heat Transfer Vinyl
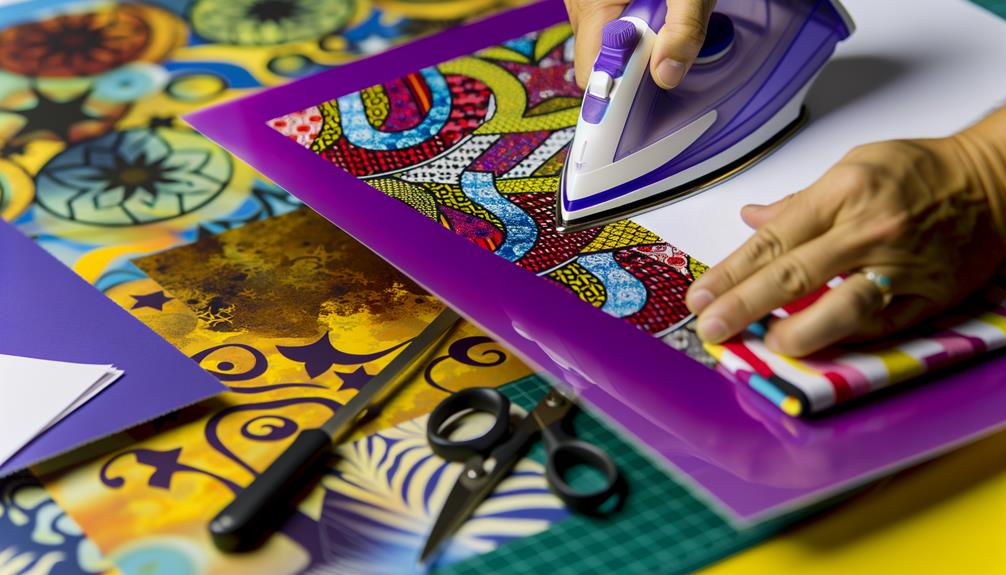
Applying heat transfer vinyl (HTV) to your water bottle is a straightforward and versatile way to add a personal touch.
Start by designing your name on a computer and cutting the design using a cutting machine. Weed the excess vinyl carefully, leaving only your design on the carrier sheet.
Preheat your bottle with a heat gun for a few seconds to guarantee good adhesion.
Position the vinyl on the bottle and cover with a Teflon sheet or parchment paper. Using a heat press or a household iron on medium heat, press firmly for about 10-15 seconds.
Allow the bottle to cool before gently peeling off the carrier sheet. Your personalized water bottle is now ready for use!
Custom Bottle Services
You can explore custom bottle services to get a professionally personalized water bottle.
Start by choosing your design options, then follow the order process steps provided by the service.
Make certain you check the material and durability of the bottle to match your needs.
Personalized Design Options
When selecting a custom bottle service, consider options like laser engraving, vinyl decals, or heat-press transfers to create a unique and personalized design. Each method offers distinct advantages:
- Laser Engraving: Provides a permanent, high-quality finish that won't fade or peel. Ideal for metal bottles.
- Vinyl Decals: Versatile and cost-effective, allowing for colorful and intricate designs. Suitable for various bottle materials.
- Heat-Press Transfers: Offers durability and vibrant colors, perfect for complex images. Best for plastic and metal bottles.
Understanding these options helps you choose the right method for your needs.
Laser engraving guarantees longevity, vinyl decals offer flexibility, and heat-press transfers provide bright, lasting visuals.
Evaluate the material of your bottle and the complexity of your design before deciding.
Order Process Steps
After choosing the perfect design method for your personalized water bottle, the next step involves understanding the order process to guarantee a smooth and efficient customization experience.
First, visit the custom bottle service provider's website and select your bottle type.
Next, upload or create your design using their online tool, making certain it fits within the specified dimensions.
Confirm your design and choose any additional options like color or font style.
Then, enter your shipping information and review your order for accuracy.
Proceed to payment, making sure all details are correct before finalizing.
Once you've placed your order, you'll receive a confirmation email with tracking information.
This methodical approach guarantees that your customized water bottle meets your expectations perfectly.
Material and Durability
Reflecting on the variety of materials available, selecting a water bottle that guarantees both durability and suitability for customization is essential. You'll want to weigh the following materials:
- Stainless Steel: Offers exceptional durability and a sleek finish, ideal for laser engraving or screen printing.
- Glass: Provides a clean taste and is perfect for decals; however, it's more fragile.
- Plastic: Lightweight and cost-effective, suitable for various printing methods, but may wear over time.
Each material has its pros and cons.
Stainless steel is robust and long-lasting, but can be heavier.
Glass is elegant but breakable, while plastic is convenient yet less durable.
Choose a material that aligns with your needs and the intended use of the bottle.
DIY Decoupage Method
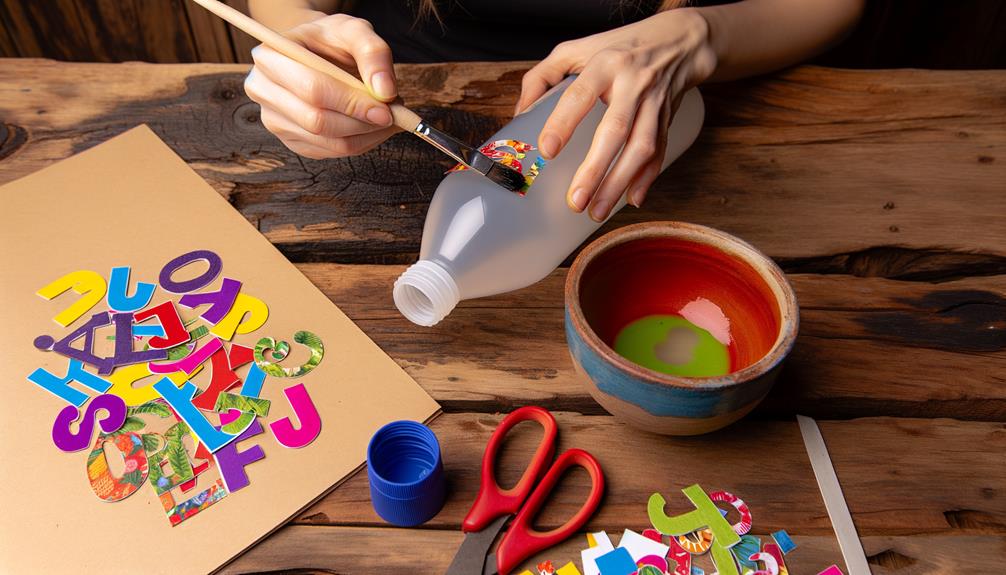
To put your name on a water bottle using the DIY decoupage method, start by gathering all necessary materials such as mod podge, a paintbrush, and printed name cutouts.
Clean the water bottle surface thoroughly to guarantee proper adhesion.
Apply a thin layer of mod podge where you want your name.
Carefully place the printed name cutouts on the wet mod podge, smoothing out any bubbles or wrinkles with your fingers.
Allow it to dry completely.
Once dry, apply another layer of mod podge over the cutouts to seal and protect them.
Let it dry again.
For extra durability, consider applying a final coat of mod podge.
Your personalized water bottle is now ready for use.
Paint Pens Technique
To start, choose a paint pen that's suitable for the material of your water bottle, ensuring it's permanent and non-toxic.
Next, clean the bottle's surface thoroughly to remove any dirt or oils.
Choosing Paint Pen Types
When choosing paint pens for personalizing your water bottle, prioritize those designed for use on non-porous surfaces to confirm durability and vibrant colors. The type of paint pen you select will greatly affect the final look and longevity of your design.
Consider these three important factors:
- Tip Size: Choose a fine tip for detailed work or a broader tip for bolder designs.
- Ink Type: Opt for oil-based or acrylic paint pens, as they adhere better to smooth surfaces and are water-resistant.
- Color Variety: Verify the set offers the colors you need for your design, including any metallic or specialty finishes.
Preparing the Bottle
Start by thoroughly cleaning the surface of your water bottle to guarantee the paint adheres properly and your design lasts.
Use warm, soapy water and a soft cloth to remove dirt, oils, and any residue. Rinse well and dry completely with a lint-free towel.
For an extra clean surface, wipe it down with rubbing alcohol using a cotton pad or paper towel. This step guarantees any remaining oils are removed.
Let it air dry for a few minutes. Avoid touching the cleaned area with your fingers to prevent oil transfer.
Applying the Name
Position your water bottle securely and shake the paint pen vigorously to confirm the paint is well-mixed.
Begin by writing your name lightly with a pencil as a guide. This helps confirm accuracy and spacing.
Follow these steps:
- Test the Paint Pen: Press the tip down on a scrap paper until the paint flows smoothly.
- Trace the Pencil Outline: Carefully trace over your pencil marks with the paint pen, applying consistent pressure.
- Allow to Dry: Let the paint dry completely to avoid smudging. This may take a few hours.
Maintain a steady hand to avoid uneven lines.
If you make a mistake, use a damp cloth to wipe off the paint quickly before it dries.
This technique confirms a crisp, personalized water bottle.
Laser Etching

Laser etching provides a precise and durable method for adding your name to a water bottle.
First, you'll need a laser etching machine, which uses focused light to engrave the surface. Start by cleaning the bottle to guarantee a smooth, debris-free surface.
Next, create a digital design of your name using graphic software compatible with the etching machine. Position the bottle securely in the machine's cradle to avoid movement during the process.
Input the design into the machine's interface, adjusting settings for depth and intensity based on the bottle's material. Begin the etching process, monitoring closely to guarantee accuracy.
Once complete, inspect the etched name for clarity and precision, making any necessary touch-ups.
Crafting With Stencils
Crafting with stencils offers a simple yet effective way to personalize your water bottle with your name.
Start by gathering your materials: a stencil with your desired font, adhesive spray, and paint suitable for your bottle's surface.
Follow these steps for a polished look:
- Prepare the Bottle: Clean and dry the surface thoroughly to guarantee the stencil adheres well.
- Apply the Stencil: Spray a light coat of adhesive on the stencil. Position it carefully on the bottle, smoothing out any bubbles.
- Paint the Name: Using a sponge or brush, apply paint over the stencil. Allow it to dry before removing the stencil to reveal your personalized design.
This method guarantees a professional finish with minimal effort.
Conclusion
You've mastered the Herculean task of labeling a water bottle.
Whether you're wielding a permanent marker with the precision of a neurosurgeon or engraving with the finesse of a renaissance artist, your bottle is now unmistakably yours.
Who knew such a mundane endeavor could be fraught with so many artistic choices?
So go ahead, sip confidently, knowing your name is emblazoned with unparalleled sophistication.
After all, why settle for anonymity when you can brandish your bottle like a masterpiece?